The WordPress Block Editor comes with a wide selection of blocks. But its extensibility means you can also create your own. It’s another way to tailor the editing experience to match your needs.
As you might expect, there are multiple ways to build custom blocks. The native solution involves using React. Native blocks are a great solution – but not a great fit for everyone.
There’s a learning curve for those of us used to working with PHP. That’s where the WordPress ecosystem comes in and offers a compelling alternative.
ACF blocks offer a more familiar developer experience. They use the Advanced Custom Fields PRO plugin – already a staple for WordPress developers. Thus, you can get up and running without learning a new workflow.
Today, we’ll take a deeper look at ACF blocks. We’ll explore what they can do and why they might make sense for your project. Best of all, we’ll build an example block!
When Do You Need a Custom Block?
Before we dig in, let’s talk about when custom blocks are helpful – and when they’re not. It’s an important concept to understand. And it could save you some work.
In a nutshell, a custom block should serve a unique purpose. That could be anything from managing a list of team members to grabbing data from a third-party service. The possibilities are pretty much endless.
Among the reasons why you’d need a custom block:
- You’re working with custom data;
- The data might change conditionally;
- You want to lock down the element’s layout (clients, you know);
- You want to use the element in multiple places;
- You don’t want to worry about editing theme templates;
A custom block may be right for you if any of the above scenarios are true. But ask yourself these questions before you go to the trouble:
- Could I achieve the same thing with a block pattern?
- Is there an existing core block or plugin that does what I need?
An acceptable solution may already exist. So, keep that in mind before you commit to building something from scratch.
The Advantage of ACF Blocks
Advanced Custom Fields has a long history with WordPress. Before the Block Editor, it offered an easy way to add custom data to pages and posts. Some developers have used it to create a page-builder-like user experience.
ACF’s flexibility means you can build custom experiences. It allows for combining data and layout elements. The result? We can make it easier for clients to update their content without the risk of breaking something.
ACF blocks are a continuation of that philosophy. All of the same field types are available. As is the process for creating custom fields. The difference is in the final packaging.
And you might even convert your old custom field implementations into blocks. That could simplify maintenance and expand their use case. It’s perfect for legacy sites that rely on custom fields.
Using ACF blocks lets you keep a similar workflow. All while taking advantage of the Block Editor. You get the best of both worlds.
Let’s Build a Simple Block
Now, let’s build a simple block using ACF. It covers a practical use case: a custom list of uploaded files.
True, WordPress has a File block. But it’s a bit clunky when trying to add multiple uploads. Our custom block will create an unordered list of files. And it should make managing those files easier for users.
Here’s how the final product will work:
Before we begin, you’ll need the following:
- A WordPress website;
- A code editor;
- Advanced Custom Fields PRO (the free version does NOT support ACF blocks);
Step #1 – Define Our Block in a Plugin
The first step is to define our block via some code. We’ll need this to attach our custom fields to the block within ACF. The plugin documentation covers the process.
Following their lead, we’ll create a PHP function that tells ACF where to find our new block:
Where to Place the Code
We could add this code within our theme’s functions.php file. However, that means our block is forever tied to the theme. What if we want to switch themes in the future?
Adding this code to a plugin makes more sense. The block will keep working – even if we change to a different theme.
There are a couple of other bonuses. First, we can add additional blocks to this plugin later on. Second, we can install the plugin on multiple sites!
The best part? We’ve put together a boilerplate plugin for you. You can download My Custom ACF Blocks on GitHub and follow along. You may also check out the plugin repository.
For reference, here’s what our file structure will look like:
/my-custom-acf-blocks

- index.php (blank)
- my-custom-acf-blocks.php (sets the configuration for the plugin)
- /blocks
- /file-list
- block.json
- block-styles.css
- file-list.php
- index.php (blank)
- /file-list
- /json
- group_5cf655a17ba10.json
- index.php (blank)
Step #2 – Create a Folder Structure and Add a block.json File
Next, we’ll create a folder structure to house our block. We set the path in the previous step to: /blocks/file-list
We’ll add these folders to our plugin. Then, inside the /blocks/file-list folder, we’ll need to add a block.json file. It will outline the basic properties of the block. Check out ACF’s documentation to learn more about the process.
Our basic structure mimics ACF’s example. There are plenty of possibilities if you want to experiment, though.
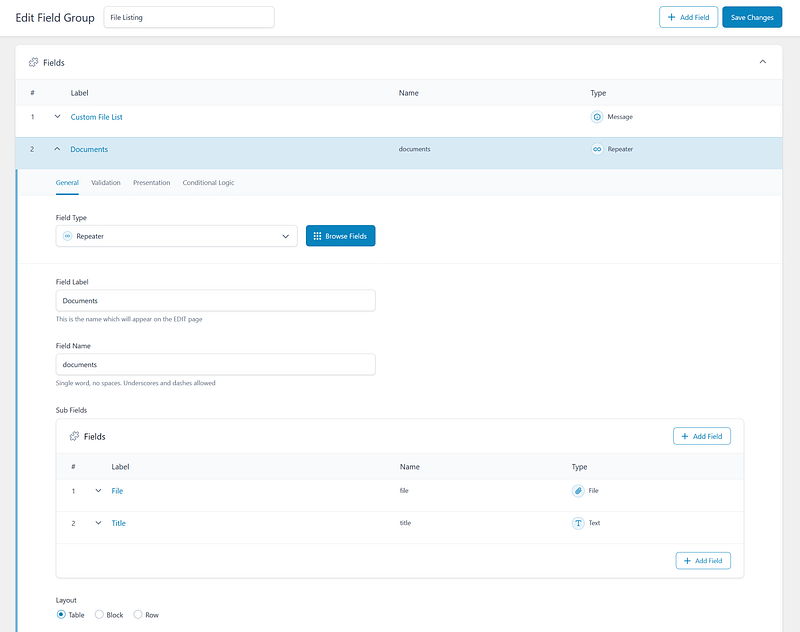
Step #3 – Create the Custom Fields
The next step is to create the custom fields that our block will use.
Our block will have will have two main fields:
- A Message field that explains what our block does. You might also place additional instructions here.
- A Repeater field that allows users to manage uploaded files. Repeaters are nested. So, we’ll include subfields for the File (field type: File) and Title (field type: Text).
*For security reasons, you can limit the file types allowed for uploading via ACF’s settings.

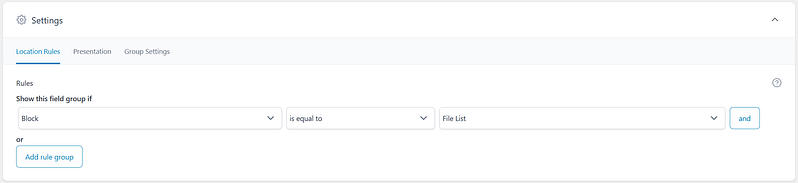
Finally, we’ll assign the fields to the File List block we defined above.
Hint: You can grab an export file of these fields on GitHub.
We’ll add the file to the /json folder in our plugin. That allows us to keep everything within a single package. Thus, we can use it on multiple sites.
Step #4 – Create a Block Template File
It’s time to start working on the block template (file-list.php). Here, we’ll determine how we want the data to look.
ACF provides an example of how to set this up. Pro tip: You can also use ACF Theme Code Pro, a plugin that generates the template for you.
Here’s how our template looks:
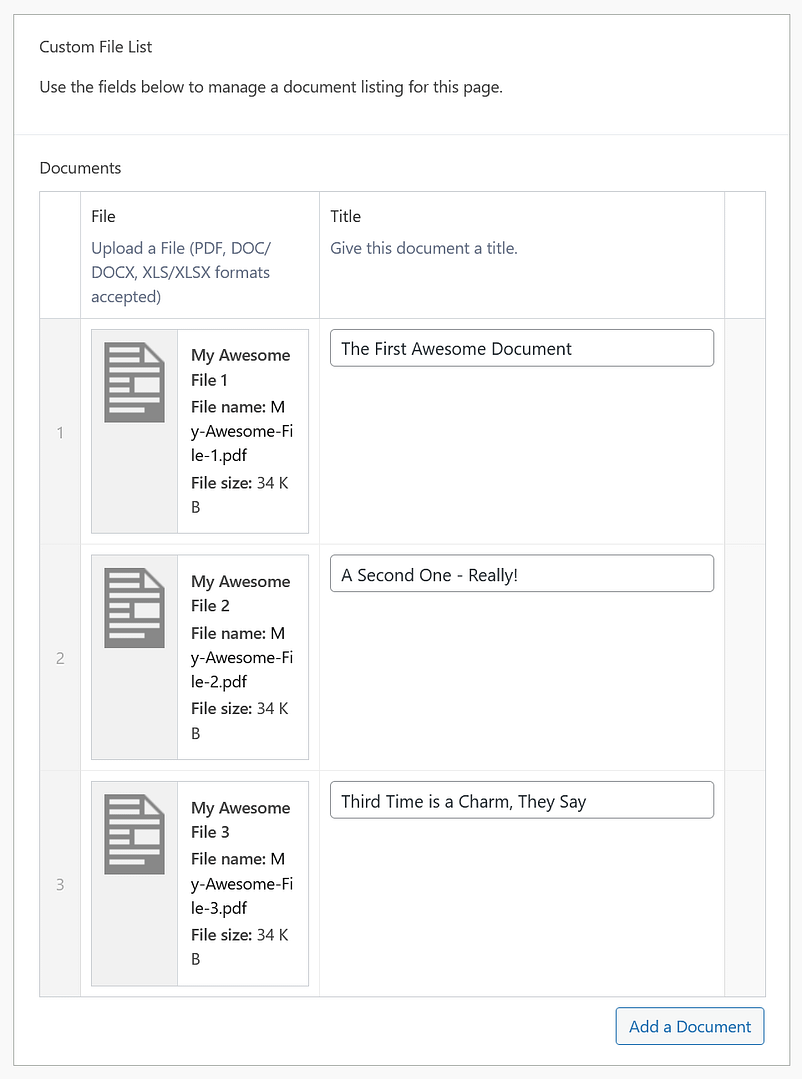
We won’t go over all the details here. However, the idea is to loop through each document added to the block and create an <li> element:
- Document 1
- Document 2
- Document 3
We’ll output the file’s URL in a hyperlink. We’ll also display the file’s title as well.
In addition, the block will generate a random CSS ID, along with a class name. Our unordered list element will have a class of .my-file-list-block. We can use this to target specific blocks or elements using CSS.
Step #5 – Create Block Styles
Our block.json file points to a stylesheet called block-styles.css. It will live in the /blocks/file-list folder we created earlier.
This step is optional. However, it does offer a way to dress up the elements of our block.
We’ll keep ours simple:
We added some margins above and below the block. We’ve also added padding and a bottom border to each list item.
That should be everything we need before testing!
Step #6 – Install, Activate, and Test the Plugin
The last step consists of installing and activating our plugin. Once again, you can download a copy from GitHub if you like.
*Note that you’ll still need Advanced Custom Fields PRO to run in tandem with our plugin.
Now, let’s test our block! Go to any page or post within WordPress and add the File List block.
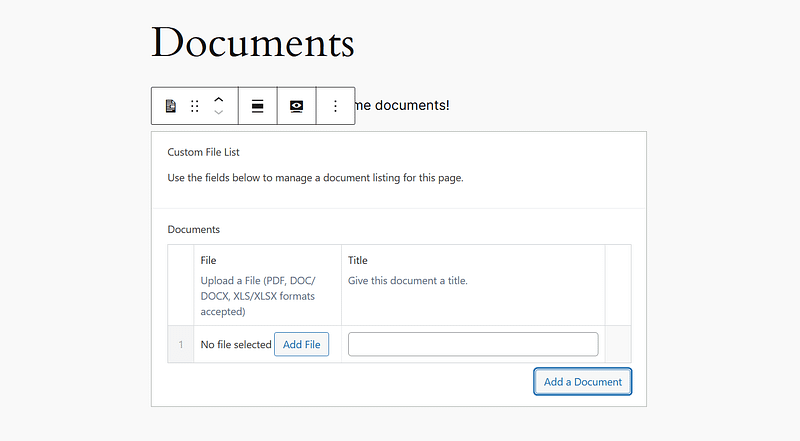
Add a test file or three, save the post, and view the results.

ACF Blocks: Another Way to Make Your Mark
ACF blocks are a reminder of how flexible WordPress is. If the thing you want isn’t available – you can build it yourself.
Perhaps our File List block isn’t the most exciting use case. However, it’s a feature that makes life a little easier. That’s the benefit of an extensible content management system (CMS).
We can use ACF blocks to improve the editing experience. That benefits us and our clients.
Even better is that there are plenty of opportunities to enhance a project. Look for them and make WordPress your own.
Join The Newsletter
Get your favorite 5 minutes of WordPress news for busy professionals every week — 100% Free! Join the WP Minute Newsletter below 👇